Video content creation for Kuno
Overview
The purpose of this article and document is to help you create easily shareable videos, interviews and films (digital storytelling and online resources) that will:
* Increase our and your library of videos, interviews, films and stories and position ourselves and yourselves as trusted voices on nature connection.
* Enable you and us to share a nature message and story more widely - helping to celebrate and respect nature.
* Tell the stories of our contributing authors and groups, and of your members and supporters to increase their exposure and your and our value to them.
* Inspire and encourage the community to celebrate and protect nature
Aim of this training
In order to achieve the relevant actions we will be helping locals, contributors, story-tellers and groups to collect video and photographic content to further your and our reach and understanding of different aspects and locations of the natural world.
This training will equip contributors with the technical knowledge of how to collect video interviews, film and stories.
We will also create written content, but this will be a separate action. Collecting photography and film will assist telling stories about nature.
Case studies on nature
A case study is essentially a ‘story’.
In video format, case studies are best to be 1-3 minutes in length, and tell the story of a specific place, species, ecosystem, character etc
Filmed as interviews, try and keep the focus on short stories as opposed to interconnected information.
The focus of the story will be on the individual aspect of nature, why it is special, its role in the ecosystem, the threats it might face and the efforts made to protect it.
Similarly, if its about a character or group working to protect nature the focus needs to be on them, the environment they work in, the challenges they face, their successes.
Guides
Guides are informative pieces that provide information on how to do something, or how to do something better.
The focus is on the action, rather than the individual or specific item themselves.
Guides can be in written format, written with supporting video content, or solely in video format. Which format we choose will be determined by the topic of the guide we have chosen.
This training will equip you to gather the video component of guides.
Delivery platforms
As you will note by the time you reach the end of this training, there are filming specifications for you to adhere to so that our finished videos are all easily shareable across multiple platforms. This is because once content is created, our goal will be to get it out there in the public domain, and thus we need to create it with that in mind.
All video content will be made to land on our YouTube channel and be of acceptable format for broadcast media. These formats can be repurposed for social media content.
The full outline of how to promote and distribute stories will be in separate article(s).
Branding guidelines
When you are creating stories, it’s important to adhere to relevant branding guidelines and the filming guide below so that there is correct format and consistency between stories.
The branding guidelines cover tone of voice, visual style etc.

Filming guidelines- Filming Permissions
Filming in the street
Legally, you can film in a public place for non-commercial purposes without permission from people in the video. This means you do not need permission from anyone to film on the street as this is not privately owned.
Avoid filming people where their face is recognisable though.
Filming in a café or privately owned / operated space
While cafes are accessible to the public, they are still (usually) a privately owned premise, so you will need permission from the cafe/owner/manager to film inside the cafe. This can be verbal or written. Either way, capture them giving it to you - e.g. via email, Instagram message, or during the filmed interview - you can ask them and have it captured on film.
If you prefer, you can use a release form.
Filming an adult with a speaking role
If you have a speaking role for any person, permission is needed - so also capture this as part of the filming.
Filming an adult who does NOT have a speaking role.
It is a good idea when filming where people will be in the background to make it clear in the venue that filming is in progress. If you do this, you do not need to worry about permissions for nonspeaking roles (except for children - see next item.)
Avoid filming any act that could be deemed as defamatory to anyone or private (including private conversations).
Also consider that there may be situations where people may not want to be filmed e.g. a random person might be the victim of domestic abuse and hiding from their perpetrator.
Be considerate when filming and if someone asks not to be filmed reassure them that their image will not be broadcast.
Filming children
As a rule, avoid filming children, even for background shots.
Speaking and nonspeaking roles for children will need a signed permission form from their parent or guardian, or if the child isn't with their parent/guardian they will need signed permission prior to filming.
How to film
Consistency is king. Please follow the technical directions below as closely as possible.
Different cameras and phones often have different available settings, so this is a guide to get things as close to consistent as possible.
I’m basing settings on iPhones as that seems to be what most people have.
Basic parameters below.
Planning the Shoot
Before you go you will need to know and do a couple of things
What is the subject of the film? Write a briefing paper to make it clear in your own mind what you are hoping to achieve.
Write a series of relevant questions to the subject and the talent.
Prepare the talent. Make sure they are ok for you to come, make an exact time, give them an overview of the topic you will discuss. Make sure they know how long it will take.
Do not try and cram too much content into an interview. Talent will get tired and lose focus after 15 or 20 minutes.
Think about the location before you get there. Is an interview ‘to camera’ possible? If not, find a suitable location nearby.
Location
Very Important - choose somewhere as quiet as possible.
If you’re in a public place, try and time the interview for a slow part of the day. Make sure the talent isn’t working and is focussed on the interview.
Try for a location relevant to the subject matter. For example if interviewing a marine biologist, a coastal location would be appropriate. If interviewing a botanist, a forest location etc
Switch phones off.
Even lighting on the face is vital. Bright backlighting will cause silhouetting. Positioning the talent facing a nearby window can help or place a lamp or other light source behind the camera to illuminate the talent's face.
Aspect Ratio / Framing
Many cameras don’t specify this but essentially video must be shot in landscape format not portrait mode - that means hold your phone on its side - not upright!
See examples below.
Technically, aspect ratio should be 16:9. Most phones don’t specify this.
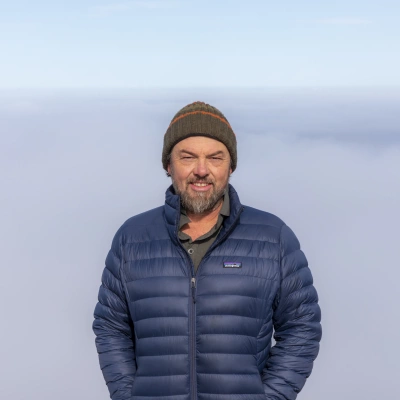
When filming an interview, good framing should look similar to the screenshot below. This is achieved by the interviewer (you), standing next to the camera (not directly behind it) and asking the talent to speak to you, not to the camera.

Note the ‘empty space’ in front of the talent. This provides a natural, conversational feel and allows for expressive hand movement from the talent. It also allows natural space for graphic elements such as name / position / business etc of the talent. With the framing in the screenshots above, the interviewer would be standing on the right hand side of the camera. This positioning can be switched to the opposite side of the frame if the interviewer moves to the left hand side of the camera.
A good method is to set the camera framing with the talent sitting down so they don’t move about too much, then, after setting up the shot and hitting record, position yourself snug in next to the camera, also at eye level with the talent (if the talent is seated the interviewer should sit, if the talent is standing the interviewer should stand).
If you need to shoot the interview standing up, eyeline methodology remains the same but you must insist the talent stand still!
Note the headroom at the top of the frame is reasonably tight. The shot looks weird if there is too much room above the head.
Camera must also be at eye level with the talent.
Talent should (if possible) be some distance away from the background to allow focal length differential - see how the background in the screenshot is defocused a bit? This allows the talent to ‘pop’ out of the background and avoids a visually cluttered image.
Stability
All videos must be shot using a tripod so the shots are stable. If anyone has access to a gimbal these can provide smooth moving shots for overlay material.
Camera Video Quality
Camera video settings must be at minimum;
Minimum requirement: High Definition or HD = 1920px (wide) x 1080px (high)
Ideally use 4K (Ultra HD) setting rather than HD - this allows for extra flexibility when editing to maintain quality for things like social media reels.
Shutter Speed or Frames Per Second (FPS)
Different shutter speeds are used across the world for different television standards. Here in Australia broadcast television is shot at 25FPS - also known as PAL format. Please use this setting (see screenshot below, for iPhone)
To complicate things some cameras only offer 24fps or 30fps - please use 24fps in this case.
You will notice there are other settings on cameras for slo-mo which have much faster shutter speeds. This can look cool for things like water movement, wildlife interaction and other actions where lots of movement is occurring. Feel free to experiment but please use the basic settings for most things. Never shoot an interview in slo-mo, the audio won’t work and it will be useless.

Audio
Audio is often an afterthought, but always the undoing of any video. If it sounds bad, no one wants to watch it. So pay close attention to audio recording.
Find a quiet location. If outside, ensure there is very little wind.
Use an external microphone rather than the camera microphone. Once again this will provide far better quality.
Locate the microphone close to the talent.
A lavalier microphone should be clipped on to a collar / lapel or high on a shirt / dress.
If using a directional or shotgun microphone place it on a small tripod close to the talent and out of shot.
Filming Overlay Footage
This means useful imagery that can ‘colour in’ the interview you have just filmed. This could be nice shots of the environment the talent is working in or the subject the talent is referring to in the interview.
It’s always good to have an ‘establishing shot’ for a film, this could be the pretty location you’re filming in, the location the talent works etc located or even a wide shot of the interior. This establishes the scene before you get into the nitty gritty of the interview.
Pay attention during the interview, take note of some of the specific topics covered. These are the specific overlay shots you need to acquire in order to ‘colour in’ the video. If the interview is about a specific thing – for example a nesting box for birds film multiple shots of the box from different perspectives! Close ups, mid shots and wider shots. Perhaps someone installing or maintain the box or the box being used by the birds.
Overlay footage is essential - it means a long and potentially rambling interview can be edited down in time dramatically. People tend to waffle on and we want to keep these videos short and punchy – viewers on the whole have short attention spans!
Film the overlay subject matter using a tripod. Static shots are far more useful and easier on the eye than hand held - the only exception is if you have access to a gimbal for your camera. If there is no option but to do a handheld shot keep movement simple and to an absolute minimum.

The focus of the story will be on the individual aspect of nature, why it is special, its role in the ecosystem, the threats it might face and the efforts made to protect it. Similarly, if its about a character or group working to protect nature the focus needs to be on them, the environment they work in, the challenges they face, their successes.
Dan Broun
Kuno Earth Media Centre Manager
Overview
The purpose of this article and document is to help you create easily shareable videos, interviews and films (digital storytelling and online resources) that will:
* Increase our and your library of videos, interviews, films and stories and position ourselves and yourselves as trusted voices on nature connection.
* Enable you and us to share a nature message and story more widely - helping to celebrate and respect nature.
* Tell the stories of our contributing authors and groups, and of your members and supporters to increase their exposure and your and our value to them.
* Inspire and encourage the community to celebrate and protect nature
Aim of this training
In order to achieve the relevant actions we will be helping locals, contributors, story-tellers and groups to collect video and photographic content to further your and our reach and understanding of different aspects and locations of the natural world.
This training will equip contributors with the technical knowledge of how to collect video interviews, film and stories.
We will also create written content, but this will be a separate action. Collecting photography and film will assist telling stories about nature.
Case studies on nature
A case study is essentially a ‘story’.
In video format, case studies are best to be 1-3 minutes in length, and tell the story of a specific place, species, ecosystem, character etc
Filmed as interviews, try and keep the focus on short stories as opposed to interconnected information.
The focus of the story will be on the individual aspect of nature, why it is special, its role in the ecosystem, the threats it might face and the efforts made to protect it.
Similarly, if its about a character or group working to protect nature the focus needs to be on them, the environment they work in, the challenges they face, their successes.
Guides
Guides are informative pieces that provide information on how to do something, or how to do something better.
The focus is on the action, rather than the individual or specific item themselves.
Guides can be in written format, written with supporting video content, or solely in video format. Which format we choose will be determined by the topic of the guide we have chosen.
This training will equip you to gather the video component of guides.
Delivery platforms
As you will note by the time you reach the end of this training, there are filming specifications for you to adhere to so that our finished videos are all easily shareable across multiple platforms. This is because once content is created, our goal will be to get it out there in the public domain, and thus we need to create it with that in mind.
All video content will be made to land on our YouTube channel and be of acceptable format for broadcast media. These formats can be repurposed for social media content.
The full outline of how to promote and distribute stories will be in separate article(s).
Branding guidelines
When you are creating stories, it’s important to adhere to relevant branding guidelines and the filming guide below so that there is correct format and consistency between stories.
The branding guidelines cover tone of voice, visual style etc.
Filming guidelines- Filming Permissions
Filming in the street
Legally, you can film in a public place for non-commercial purposes without permission from people in the video. This means you do not need permission from anyone to film on the street as this is not privately owned.
Avoid filming people where their face is recognisable though.
Filming in a café or privately owned / operated space
While cafes are accessible to the public, they are still (usually) a privately owned premise, so you will need permission from the cafe/owner/manager to film inside the cafe. This can be verbal or written. Either way, capture them giving it to you - e.g. via email, Instagram message, or during the filmed interview - you can ask them and have it captured on film.
If you prefer, you can use a release form.
Filming an adult with a speaking role
If you have a speaking role for any person, permission is needed - so also capture this as part of the filming.
Filming an adult who does NOT have a speaking role.
It is a good idea when filming where people will be in the background to make it clear in the venue that filming is in progress. If you do this, you do not need to worry about permissions for nonspeaking roles (except for children - see next item.)
Avoid filming any act that could be deemed as defamatory to anyone or private (including private conversations).
Also consider that there may be situations where people may not want to be filmed e.g. a random person might be the victim of domestic abuse and hiding from their perpetrator.
Be considerate when filming and if someone asks not to be filmed reassure them that their image will not be broadcast.
Filming children
As a rule, avoid filming children, even for background shots.
Speaking and nonspeaking roles for children will need a signed permission form from their parent or guardian, or if the child isn't with their parent/guardian they will need signed permission prior to filming.
How to film
Consistency is king. Please follow the technical directions below as closely as possible.
Different cameras and phones often have different available settings, so this is a guide to get things as close to consistent as possible.
I’m basing settings on iPhones as that seems to be what most people have.
Basic parameters below.
Planning the Shoot
Before you go you will need to know and do a couple of things
What is the subject of the film? Write a briefing paper to make it clear in your own mind what you are hoping to achieve.
Write a series of relevant questions to the subject and the talent.
Prepare the talent. Make sure they are ok for you to come, make an exact time, give them an overview of the topic you will discuss. Make sure they know how long it will take.
Do not try and cram too much content into an interview. Talent will get tired and lose focus after 15 or 20 minutes.
Think about the location before you get there. Is an interview ‘to camera’ possible? If not, find a suitable location nearby.
Location
Very Important - choose somewhere as quiet as possible.
If you’re in a public place, try and time the interview for a slow part of the day. Make sure the talent isn’t working and is focussed on the interview.
Try for a location relevant to the subject matter. For example if interviewing a marine biologist, a coastal location would be appropriate. If interviewing a botanist, a forest location etc
Switch phones off.
Even lighting on the face is vital. Bright backlighting will cause silhouetting. Positioning the talent facing a nearby window can help or place a lamp or other light source behind the camera to illuminate the talent's face.
Aspect Ratio / Framing
Many cameras don’t specify this but essentially video must be shot in landscape format not portrait mode - that means hold your phone on its side - not upright!
See examples below.
Technically, aspect ratio should be 16:9. Most phones don’t specify this.
When filming an interview, good framing should look similar to the screenshot below. This is achieved by the interviewer (you), standing next to the camera (not directly behind it) and asking the talent to speak to you, not to the camera.
Note the ‘empty space’ in front of the talent. This provides a natural, conversational feel and allows for expressive hand movement from the talent. It also allows natural space for graphic elements such as name / position / business etc of the talent. With the framing in the screenshots above, the interviewer would be standing on the right hand side of the camera. This positioning can be switched to the opposite side of the frame if the interviewer moves to the left hand side of the camera.
A good method is to set the camera framing with the talent sitting down so they don’t move about too much, then, after setting up the shot and hitting record, position yourself snug in next to the camera, also at eye level with the talent (if the talent is seated the interviewer should sit, if the talent is standing the interviewer should stand).
If you need to shoot the interview standing up, eyeline methodology remains the same but you must insist the talent stand still!
Note the headroom at the top of the frame is reasonably tight. The shot looks weird if there is too much room above the head.
Camera must also be at eye level with the talent.
Talent should (if possible) be some distance away from the background to allow focal length differential - see how the background in the screenshot is defocused a bit? This allows the talent to ‘pop’ out of the background and avoids a visually cluttered image.
Stability
All videos must be shot using a tripod so the shots are stable. If anyone has access to a gimbal these can provide smooth moving shots for overlay material.
Camera Video Quality
Camera video settings must be at minimum;
Minimum requirement: High Definition or HD = 1920px (wide) x 1080px (high)
Ideally use 4K (Ultra HD) setting rather than HD - this allows for extra flexibility when editing to maintain quality for things like social media reels.
Shutter Speed or Frames Per Second (FPS)
Different shutter speeds are used across the world for different television standards. Here in Australia broadcast television is shot at 25FPS - also known as PAL format. Please use this setting (see screenshot below, for iPhone)
To complicate things some cameras only offer 24fps or 30fps - please use 24fps in this case.
You will notice there are other settings on cameras for slo-mo which have much faster shutter speeds. This can look cool for things like water movement, wildlife interaction and other actions where lots of movement is occurring. Feel free to experiment but please use the basic settings for most things. Never shoot an interview in slo-mo, the audio won’t work and it will be useless.
Audio
Audio is often an afterthought, but always the undoing of any video. If it sounds bad, no one wants to watch it. So pay close attention to audio recording.
Find a quiet location. If outside, ensure there is very little wind.
Use an external microphone rather than the camera microphone. Once again this will provide far better quality.
Locate the microphone close to the talent.
A lavalier microphone should be clipped on to a collar / lapel or high on a shirt / dress.
If using a directional or shotgun microphone place it on a small tripod close to the talent and out of shot.
Filming Overlay Footage
This means useful imagery that can ‘colour in’ the interview you have just filmed. This could be nice shots of the environment the talent is working in or the subject the talent is referring to in the interview.
It’s always good to have an ‘establishing shot’ for a film, this could be the pretty location you’re filming in, the location the talent works etc located or even a wide shot of the interior. This establishes the scene before you get into the nitty gritty of the interview.
Pay attention during the interview, take note of some of the specific topics covered. These are the specific overlay shots you need to acquire in order to ‘colour in’ the video. If the interview is about a specific thing – for example a nesting box for birds film multiple shots of the box from different perspectives! Close ups, mid shots and wider shots. Perhaps someone installing or maintain the box or the box being used by the birds.
Overlay footage is essential - it means a long and potentially rambling interview can be edited down in time dramatically. People tend to waffle on and we want to keep these videos short and punchy – viewers on the whole have short attention spans!
Film the overlay subject matter using a tripod. Static shots are far more useful and easier on the eye than hand held - the only exception is if you have access to a gimbal for your camera. If there is no option but to do a handheld shot keep movement simple and to an absolute minimum.
The focus of the story will be on the individual aspect of nature, why it is special, its role in the ecosystem, the threats it might face and the efforts made to protect it. Similarly, if its about a character or group working to protect nature the focus needs to be on them, the environment they work in, the challenges they face, their successes.
You might like...

How to use Kuno
Kuno is your platform to share a love of Earth. Here is a simple guide for how to use it.

How to save life on Earth
Biologist and Pulitzer winner E.O. Wilson's proposes a bold plan to preserve the world’s biodiversity: set aside half of the entire planet for natural habitats.

Hobart launch: writer Helen Cushing on how to contribute to Kuno
Storytelling has always been for me a way of helping people learn about Nature, and perhaps even learn to love Nature, says writer and journalist Helen Cushing. To me, Kuno is a bit like a digital campfire that we can come to and tell our stories, inspire each other, connect and importantly re-connect with Nature.

What is Kuno?
Kuno is the nature platform for life on Earth. A two-way platform of contributors and users, Kuno is created by us, for us. Kuno's mission is to kindle the loving bond between people and Earth to ensure a future where both thrive together.
Newsletter
Sign up to keep in touch with articles, updates, events or news from Kuno, your platform for nature